Graphical Editing process
My Practicum experience
My name is Makayla and as part of my Archival Management of Small Repositories class I was asked to do a practicum of at least 10 hours. I made my decision to do my practicum with the Antique Pattern Library because it combines my passions of archives and preserving history with fiber arts.
As my project I worked to graphically edit a scan of The Workbasket Vol. 15 No. 1 from October of 1949. As I went through the process, I realized that a text copy of the process would have been helpful for me to reference, so I’m hoping that this post can help others who volunteer to do graphical editing in the future. I was not able to do all of the steps of the process independently so there are a couple steps that aren’t going to have a ton of detail.
The first thing to figure out is the graphical editing software that you will use. I had no preferences for one, so I decided to use Paint Shop Pro 9 as that is the program that Sytske uses. This would allow me to follow the editing tutorial video that she created closer than if I was using a different program. There are four main tools that I used during the process: Cropping, Selection, Straitening/Deskewing, and Paint Brush. There is also the chance that you would need to adjust the Highlight/Midtone/Shadow settings of some of the pictures, but that wasn’t the case for the scan that I worked on. If need be Sytske shows how to use this tool for lightening a image at 29:28 in the editing tutorial. If I wasn’t able to understand how to use the tools from Sytske’s video tutorial, I utilized a User Guide for Paint Shop Pro 9 that I found online. I’ve included a link to it at the end of the post for anyone that is also going to use the program.
Once you have your scan the first step is to Rotate, Crop, Split, and Rename your pages.
An Original Scan can look like this: 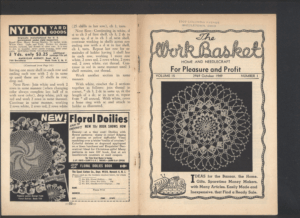
I started with rotating my pages; however, I ended up doing so in my computers photo app rather than in Paint Shop Pro 9. Once my scans were rotated, I opened up all of the pages into Paint Shop Pro 9 in order to crop them. I did this by dragging and dropping all of the scanned pages into the opened application. The first crop is just a rough one to remove any excess border along the outside of the pages that was created when it was scanned in. The crop tool is easier for this as it allows you to readjust your lines unlike the selection tool.
Next is either to crop or select an individual page of the scan, which gets saved as the page number into a folder labeled B-CroppedRotatedRenamedSplit. You then undo your work and select the opposite page and save it into the same folder as its page number. You repeat this process until you have gotten all of your pages individualized in the new folder. These two steps can be found at 4:10 in the editing tutorial.
After this step the page will look similar to: 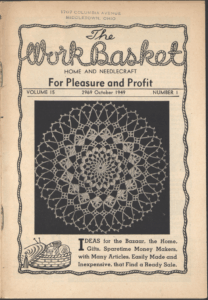
The next step is to Deskew or Straighten the pages. Sytske has a program that does the initial straightening for her that I wasn’t able to find, so I straightened my pages manually in Paint Shop Pro 9 instead. Even with the program there is the possibility of having to manually straighten some of the pages, so its not a bad skill to learn. These straightened pages get saved as in a folder named C-Deskewed. Sytske shows how to use deskew for straightening pages at 6:42 and how to manually straighten the pages at 10:11 in the editing video.
Here is what one page looked like before and after straightening, its not a huge difference in this case as the original scans were fairly straight to begin with.
Before: 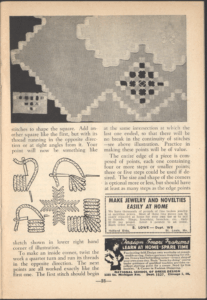
After: 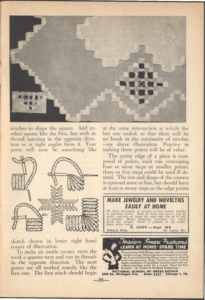
Lightening the pages is the next step, which is one of the steps that I wasn’t able to do myself because it is limited software. So, I sent Sytske a zipped folder of my deskewed pages. She shows the process of using Stuffer to lighten the pages in her editing tutorial at 15:25. These lightened pages get saved into a folder named D-Stuffed66.
This is a page after it has been lightened: 
Next is to Resize the pages and to do any final edits, such as removing any extraneous black spots on the pages. The dimensions for vertical orientated pages are 2200×3150 pixels. I ended up resizing each page twice. Once to estimate the actual size needed, then I cropped out any messy marks at the edges of the pages usually from scanning where the booklet was bound. I then resized it again to make sure the pages were the final size needed.
Next is to switch all of the pages to greyscale. This makes the pages actually black and white, rather than just appearing so. You then use the Paint Brush tool to make any final touch ups. When I went to remove a black spot in the margin of one of my pages, my paint brush tool had defaulted to black making the spot even bigger. So double check what color your paint brush tool is set up to use before going to make the edits. These pages get saved as to a folder labeled E-EditedResized. These steps can be found in the editing video at 17:25.
Here is what a page will look like after the process has been finished: 
The last step of the editing process was to create a thumbnail and a possible feature image for the scan. The thumbnail is created by resizing the cover page to 100×143 pixels for a vertically oriented page. The thumbnail is saved to the general folder for the scan; in my case the folder was labelled I-WB151-Wb15V01-SCANNED-I710. The feature image needs to be short and wide in order to function correctly for the website, so it often ends up being some type of edging. This gets saved to the same place as the thumbnail. This can be found at 30:17 of the editing tutorial.
Here is an example of the feature image that I chose from this scan: 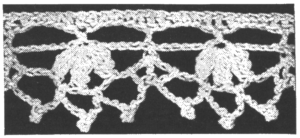
After these steps I sent back my final edits to Sytske in order to add watermarks and prepare them for publishing. The last step that I had to take was to figure out the description for the workbasket scan. This is made up of both the physical characteristics of the scan (Stapled softcover, 32 pages) as well as the different patterns and articles that were in the volume.
I learned a lot during this practicum, not just about graphical editing, so here are a few takeaways that were the most important to me.
- I really enjoyed the process of editing the scans, even though the process can get repetitive. I now know that digitization projects are something that I would be interested in working on.
- Watching the tutorial Sytske created for the publishing process makes me want to go review the coding that I learned during my undergraduate degree. Obviously, this is a highly specialized program for the Antique Pattern Library, but it wouldn’t hurt to brush up on my skills.
- I originally thought that what I would be most interested in with the scans would be the patterns. However, I ended up being more interested in the ads instead. I found it really wonderful to see ads that aren’t that different from ads that you would see today. One that was in the scan that I processed was for hearing aids that were more discrete than previous models. This is a claim that I’ve heard in television ads about hearing aids multiple times. It just goes to show that the more things change the more they stay the same.
- I was really grateful to be given a fairly clean scan to work off of for my first one. There are a lot of steps to go through, and the final edits would have taken a lot longer to complete if the scan wasn’t as nice.
I greatly enjoyed my time helping out at the Antique Pattern Library and it is something that I hope I will be able to continue helping with.
User Guide Link : https://flagoptions.com/wp-content/uploads/Jasc-Paint-Shop-Pro-9-User-Guide.pdf